
The Protea's Topology
About
Computational Design
Location
Rhinoceros 3D
Focus
A Section of Protea Flower
Year
2024
Keywords
Iteration, Biomimicry, Doubly Curved Surfaces, Fabrication
Overview
This is the 2nd assignment that I did during my first semester at Unimelb. The task is to use Rhino and the PanelingTools plugin to design a paneled surface based on a section of my chosen botanical agent, which is the Protea Flower!
The main aim of this process to explore developable surfaces and fabrication techniques. More broadly speaking, this offers a simplified experience of computational methods and iterative design in expert practices.
.png)
Choosing a Fragment
I chose this fragment from the bottom view of the protea because of its clear morphological characteristics and its interesting distribution pattern.
DO YOU KNOW?
The protea follows the Fibonacci spiral because it provides an efficient way to pack seeds and petals. This spiral pattern allows for optimal exposure to sunlight and efficient use of space by minimizing gaps and overlaps.

Analysing Morphological Features
About Computational Design
Computational design involves using algorithms, parametric models, and digital tools to create and optimize complex design solutions that are often unattainable through traditional methods (Terzidis K., 2006, Algorithmic Architecture).
Given the significance of computational design, this project is an abstract practice where I used digital tools to simulate the morphological features of a fragment of the Protea flower.

Surface Sculpting
I generated a planar surface in Rhino from curves and use the surface’s control points to adjust its shape. By doing so, I “sculpted” the surface to abstractly represent the image fragment’s topology.

Grid Study
For the grid study, I used the PanelingTools plug-in to generate a 10x10 grid of points using the surface I sculpted. Then, I created a second grid of points at a fixed distance above the first grid. Because each pyramidal panel is generated based on the position of both grids, every panel is different. For this reason, the grid study is best at portraying movement, directionality, and flow.

Panel Study
In the next stage of the project, I implemented another approach to creating panels using the same objects: a bottom grid, top grid, and point attractors. Rather than using attractors to affect the position of points on the top and bottom grid, I used them to determine the position of three or more custom panel geometries that I created.

Hybrid Study
I used the command 'ptPanel3DCustomVariable' to distribute custom panels on a top and bottom grid produced for the grid study. In effect, this combines a panel study and grid study into a hybrid iteration. Two main challenges at this stage are developability issues and organisation of the resulting iterations.
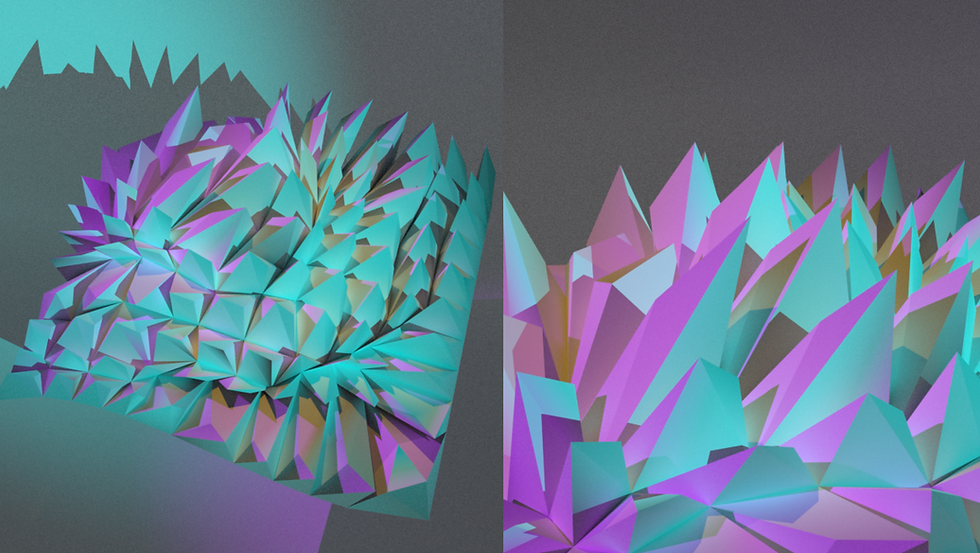
Renders of the Chosen Hybrid
After resolving the developability issues and finalizing a hybrid form I was satisfied with, I rendered an overall and a detailed view. I experimented with a sci-fi inspired lighting setup based on the three-point lighting theory — using a cyan key light, a pink fill light, and a yellow back light to create a vibrant, cinematic atmosphere

Unroll with OpenNest - Reduce Material Waste
Although the task required unrolling only three panels from the chosen hybrid, I went on to unroll a quarter of the whole patch with OpenNest. This not only demonstrated my understanding of developability requirements, but also optimized the nesting of panels into A4 sheets. By tightly nesting the components, I was able to minimize material waste and ensure efficient use of natural resources, which is both cost-effective and environmentally beneficial. This process exemplifies the importance of sustainable design practices in reducing environmental impact.

At first the nodes looked very complex and I met a lot of unexpected problems: the panels kept overlapping each other, the tabs did not appear, etc.
After numerous trials and errors, I simplified the nodes and it finally worked! This teaches me that complexity in design is not always necessary. Instead, simple, efficient solutions can be more impactful.
Unroll with OpenNest - My experiment with Grasshoper

Model Making Process

3D Printing
Concluding Words
I failed a lot...
I faced many challenges throughout the process. There were significant developability issues with both the hybrid study and the panel study, as shown in the image on the right. The unrolled panels also had nesting problems, with overlapping panels and missing tabs. For the paper model, I struggled to figure out where each pyramid should go while having to deal with time constraints.
But I learned more than that
Everything was a first for me, from learning to use new tools to understanding complex concepts. This experience taught me that design is a trial-and-error process rather than a straightforward path.

This image shows the amount of patches with developability issues that cannot be used